Showing posts with label recipes. Show all posts

Friday, April 27, 2012

chocolate and peanut butter


Just thought I'd share ...
...even though you'll probably wish that I hadn't ...

... that I have found something wonderful.

Peanut butter smeared onto a warm brownie. Mhmm. Yummm.

Not really a recipe at all, but soooo good!
(warning - they can be a bit addicting. As in, you realize that you just ate a quarter of the pan by yourself type of addicting)


You're welcome.


<3


Friday, November 04, 2011

apple tarte tatin (sort of)

The other night I made one of my favorite simple desserts - an apple tarte tatin - and it was so simple that I didn't use a recipe. I made it once from Williams-Sonoma's Pie and Tart, and have been making a version of it every so often from memory. And they've all been really good. (and really simple to make - always a good thing : D)

To make our version, you start with a few apples (2-4, depending on their size) which you slice thinly. I like to leave the skins on, but I think if you wanted to make an authentic apple tarte tatin you would need to take them off.
Then you sprinkle about 1 cup of sugar evenly on the bottom of an oven-proof skittle/frying pan. Dot that with 4 tablespoons of butter and then arrange the apples on top. The round part (outside) of the apples should be facing the bottom of the pan - you will eventually turn the entire thing upside-down and the bottom will become the top.
Then you top the entire thing with a piece of pie dough (or puff pastry - both are absolutely delicious options) and tuck the edges down.

Bake it in a 375 degree oven for about an hour or until the apples are tender when you poke it with a fork.
Let it rest for about 5 minutes and then place your serving plate on the skillet and (very quickly and carefully) flip the tatin upside-down onto your plate.

The combination of caramelized sugar and butter and apples and flaky dough is amazing! You can serve it with ice cream or whipped cream, but to do so is really gilding the lily. : )


Oh! I also have started growing herbs on our kitchen windowsill and love it! We have a pot of basil that has been so delicious to use and the cilantro is almost ready. I started some rosemary too and am waiting to see if it will sprout. Fresh herbs have been so wonderful!


Sunday, September 19, 2010

flaming baked cappuccino alaska

One of the Jacobsen family traditional favorites is Baked Alaska. It's a very special dessert and would usually only be made for very special occasions - such as when Dad's little brother was in the States.
It's best when it's eaten all in one sitting, so having a table full of people was also a prerequisite!

John and I didn't have anything special happening, but a few days ago I had a hankering for some charred meringue atop of a slice of ice cream and cake. Plus, I felt that John needed to experience something that I had such fond memories of!

I knew the gist of the recipe by heart - slices of cake in the bottom of a pie dish topped with ice cream and meringue, brown the meringue, splash it all with some alcohol and strike a match - but I pulled out my copy of the Joy of Cooking just to be sure. :)

According to the Joy of Cooking, the first step is to line your baking dish with a half inch layer of cake - both sponge and angel cake are recommended. My family always used pound cake which tasted delicious and stood up to the weight of the ice cream quite well. I deviated from both and used a pan of brownies as the base.

Next, make up your meringue. Beat 6 egg whites until frothy. Beat in 1/2 tsp cream of tartar, a pinch of salt, 2/3 cup sugar (adding the sugar slowly) and 1 tsp vanilla and continue to beat until the egg whites are stiff.

Once the meringue is quite stiff and glossy, mound 1 - 1 1/2 quarts of slightly softened ice cream on top of the cake. I used coffee ice cream, but any flavor combinations are acceptable! Fruit flavored ice cream is especially good.
Joy of Cooking says to next lay strips of your cake over the mounded ice cream. I didn't, and my meringue didn't quite cook through, so I am guessing that this is an important step! At this point you may choose to freeze the Baked Alaska for 30 minutes or so to firm it up.

Spread the meringue over the ice cream and cake, taking care to cover right down to the edge of the baking dish.
Rinse off half of one of the egg shells and place it on the top (this will hold the alcohol).
Brown the whole thing under a 500 degree broiler for no more than 3 minutes. It browns quickly, so watch carefully!
Grab some plates and forks and matches and tell everyone to gather round! Pour about 2-3 tblsp of alcohol into the egg shell and shake the Baked Alaska so that some runs down the sides. Strike a match, turn off the lights ... and voila!

Saturday, September 04, 2010

the recipe


I mentioned that the granola I made turned out really, really good .... but didn't get around to posting a recipe. So, now I am!

Tawny Granola (loosely adapted from Miss Dahl's Voluptuous Delights by Sophie Dahl)
2 cups oats
1/2 cup sliced almonds
1/2 cup shredded coconut
2 teaspoons vanilla extract
1/2 cup honey
2 tablespoons apple juice 
1 tablespoon ground cinnamon
1 teaspoon ground allspice
1 pinch fresh ground nutmeg
1/2 cup dried fruit (I used a mix of raisins and dried cranberries)

Preheat oven to 350 and oil a large rimmed cookie sheet.
In a mixing bowl combine the oats, nuts, coconut and fruit. In a separate large mixing bowl, mix the wet ingredients and the spices. Combine the dry ingredients with the wet.

Spread the mixture evenly on the cookie sheet, using a spatula to smooth it. Bake for around 40 minutes, keeping an eye on it so that it doesn't get over done. When it starts to brown, turn the mixture over with the spatula to make sure that it toasts evenly on both sides.

When it is ready, take it out of the oven and let it cool. Store in an airtight container and serve with milk or yogurt. :)

Saturday, August 28, 2010

strawberry scones

If you've ever had your scones turn out heavy and rather unappetizing, you  might be thinking "hm, those look good but I can't make them". You can. I did. And they are sooooo light and creamy! I found the recipe over on Annie's Eats (I really love her recipes!) and have made it over and over.

The main difference between this recipe and the other ones I have tried (and I have tried many) is that is calls for yogurt instead of cream or half and half. Maybe that's what makes them so good?
These also freeze really well!


Strawberry Scones
Ingredients:
1 large egg
¼ cup plain or vanilla yogurt
½ cup milk
1 tsp. orange or lemon zest [I've been using orange and it tastes wonderful!]
2¼ cups all-purpose flour
¼ cup sugar, plus more for sprinkling
1 tbsp. baking powder
½ tsp. salt
8 tbsp. cold unsalted butter, cut into small pieces
1 heaping cup diced fresh strawberries [I use thawed frozen berries because they are cheaper - and because I usually have some on hand]

Directions:
In a small bowl, whisk together the egg, yogurt, milk and citrus zest until blended; set aside.  In the bowl of a food processor combine the flour, sugar, baking powder, and salt.  Pulse briefly to blend.  Add the butter pieces to the bowl with the dry ingredients and pulse several times to cut the butter into the flour, until the largest butter pieces are the size of small peas.  (If you don’t have a food processor, you can just as easily mix up the dry ingredients in a mixing bowl and cut in the butter using a pastry blender or two knives or forks.)  Transfer the mixture to a large mixing bowl.

Add the strawberries to the flour mixture and toss to coat.  Add the wet ingredients to the bowl with the dry ingredients and gently fold together with a fork or spatula until a sticky dough has formed.  Knead just a few times to ensure that all the dry ingredients are incorporated and the dough is cohesive.  (Only if absolutely necessary, add more milk 1 tablespoon at a time to hydrate the remaining dry ingredients.)
Transfer the dough to a well floured work surface and pat into a disc about 7-8 inches in diameter.  Sprinkle lightly with additional sugar.  Slice the disc into 8 wedges.

To bake the scones, preheat the oven to 425˚ F.  Line a baking sheet with a silicone baking mat or parchment paper.  Place the shaped scones on the prepared baking sheet and bake until lightly browned on top, about 15 minutes.  Let cool a few minutes before serving.

To freeze, transfer the baking sheet with the shaped scones to the freezer and let them chill until they are firm, 30-60 minutes.  Wrap the scones individually and store in a freezer-safe bag until ready to bake.  Bake as originally indicated, adding a few minutes to the baking time (usually about 18-20 minutes for me.)

Tuesday, August 17, 2010

homemade granola


 before being put in the oven

I made granola the other day and it turned out better than I thought it would (aside from being slightly burnt)!
The recipe ended up being a combination of three that I had on hand, using the things that sounded good to me and leaving out the things that didn't (or that we didn't have in the cupboard).

All done! Yum.


Monday, August 02, 2010

triple ginger cookies


One of my favorite summertime flavor combinations is lemon and ginger (well, anytime combinations really). Lemon cheesecake with a ginger crust. Gingerbread cake and lemon curd. And lemonade with gingersnaps.
I had a hankering for the fresh and tangy combo again last week and made up some ginger cookies - not gingersnaps though. These are really, really zingy Triple Ginger Cookies. So zingy that instead of using a typical "rounded spoonful" of dough, these are only 1/2 a tablespoon worth each. Pretty much the size of a quarter.


2 cups spelt flour OR whole wheat pastry flour (I used whole wheat)
1 teaspoons baking soda
1 teaspoon star anise, finely ground
4 1/2 teaspoons ground ginger
1/2 teaspoon fine grain sea salt
1 stick (1/2 cup) unsalted butter, room temperature
1/4 cup unsulphured molasses
2/3 cup fine grain natural cane sugar, sifted (I used Xylitol)
1 1/2 tablespoons fresh ginger, peeled and grated
1 large egg, well beaten
1 cup crystallized ginger, then finely minced
2 lemons, zest only (I used orange zest)
Preheat the oven to 350F degree. Line a couple baking sheets with unbleached parchment paper or a Silpat mat (I used a knock-off version of a Silpat from Crate and Barrel), place the extra sugar in a small bowl, and set aside.
In a large bowl whisk together the flour, baking soda, star anise, ground ginger, and salt.
Heat the butter in a skillet until it is just barely melted. Stir in the molasses, natural cane sugar, and fresh ginger. The mixture should be warm, but not hot at this point, if it is hot to touch let it cool a bit. Whisk in the egg. Now pour this over the flour mixture, add the crystallized ginger (make sure it isn't too clumpy), and lemon zest. Stir until just combined.
I like these cookies tiny, barely bite-sized, so I scoop out the dough in exact, level tablespoons. I then tear those pieces of dough in two before rolling each 1/2 tablespoon of dough into a ball shape. From there, grab a small handful of the big sugar you set aside earlier and roll each ball between your palms to heavily coat the outside of each dough ball. Place dough a few inches apart on prepared baking sheets. Bake for 7-10 minutes or until cookies puff up, darken a bit, get fragrant and crack.
Makes about 4 dozen or so.

Friday, July 02, 2010

summer = rhubarb


I found a recipe for baked/stewed rhubarb over on Orangette a few months ago and the other night I made it.
It's delicious. And refreshing. And addicting.
Oh yum.

It's also pretty simple to make, which is a really nice feature right now!

Roasted Rhubarb
2 lb. rhubarb, trimmed and cut into 3-inch lengths
½ cup sugar
½ cup crisp white wine
1 vanilla bean, split (I used about 1/2 tsp of liquid vanilla that I added about 5 minutes before it was done)

Set a rack in the lower third of the oven, and preheat the oven to 350°F.
Put the rhubarb in a Dutch oven or other deep oven-safe pot. Add the sugar, wine, and vanilla bean, and stir to mix. Bake (uncovered) for about 30 minutes, or until very tender, giving the pot a gentle stir about midway through to ensure that the rhubarb cooks evenly.

Tuesday, June 22, 2010

father's day dessert


Because John had to work on Father's Day, I wanted to make an extra special dessert for him.
I found a recipe for "Heaven and Hell" cake (so called because it has both Angel Food and Devil's Food cake layers in it) on Saveur.com, and Julia pitched in and helped me make it (actually, she did most of the work - thank you Julia!!!).

The recipe says this cake is rich, but I'd have to say it goes beyond that. It is very, extremely rich. Oh. My.
And so so good.
The only thing I'd change is the peanut butter mousse filling. There's so much of it that you actually could cut it in half and still have a great dessert.
I think I'd really like to try it again, but with a fruit filling perhaps. Maybe raspberry? Strawberry? Cherry?

 
For the Ganache:
2 lbs. milk chocolate, such as Valrhona, chopped
1 1/2 cups heavy cream

For the Angel Food Cake:
1 1/2 cups confectioners' sugar
1 cup cake flour
1 1/2 cups egg whites
1 tsp. cream of tartar
1/8 tsp. kosher salt
1 cup sugar
2 tsp. vanilla
1 tsp. almond extract

For the Devil's Food Cake:
1/2 cup vegetable shortening, plus more for pan
1 1/2 cups cake flour, plus more for pan
1 tsp. baking soda
3/4 tsp. kosher salt
1/4 tsp. baking powder
1 cup coffee
1/2 cup cocoa powder, sifted
1 1/2 cups sugar
1 tsp. vanilla
2 eggs


For the Peanut Butter Mousse:
1 1/2 lbs. cream cheese, at room temperature
4 cups smooth peanut butter, at room temperature
3 1/2 cups confectioners' sugar, sifted
1 1/2 cups heavy cream


1. Make the ganache: Place the chocolate in a medium-size bowl. Bring cream to a boil in a 2-qt. saucepan; pour cream over the chocolate and let sit to melt for 5 minutes. Using a rubber spatula, combine the chocolate and cream. Cover with plastic wrap and set aside to let rest for 4 hours.
2. Make the angel food cake: Heat oven to 325°. Line bottom of a 10" round cake pan with ungreased parchment paper. In a medium bowl, sift together confectioners' sugar and flour; set flour mixture aside. In a large bowl, beat egg whites, cream of tartar, and salt with a handheld mixer on low speed until frothy. Increase mixer speed to medium, sprinkle in sugar, vanilla, and almond extract, and beat until stiff peaks form. Sprinkle half of the confectioners' sugar–flour mixture over egg whites; using a rubber spatula, fold until just combined. Repeat with remaining flour mixture. Pour batter into prepared cake pan and bake until top of cake springs back when touched, 45–50 minutes. Transfer cake to a rack and let cool.
3. Make the devil's food cake: Heat oven to 350°. Grease a 10" round cake pan with shortening and dust with flour to coat; shake out excess flour and set pan aside. In a medium bowl, whisk together cake flour, baking soda, salt, and baking powder; set flour mixture aside. In another medium bowl, whisk the coffee and cocoa powder until smooth; set coffee mixture aside. In a large bowl, beat the shortening, sugar, vanilla, and eggs with a handheld mixer on medium speed until pale and fluffy, 2 minutes. Alternately add the flour mixture and the coffee mixture to the bowl in 3 stages, beating to combine after each addition. Pour the batter into the prepared cake pan and bake until a toothpick inserted into cake comes out clean, 30–35 minutes (we found that it was more like 40 in our oven); transfer to a rack and let cool completely.
4. Make the peanut butter mousse: In a large bowl, beat cream cheese, peanut butter, and confectioners' sugar with a handheld mixer on medium speed until smooth and fluffy, about 3 minutes. Put cream into a large bowl and beat on high speed until stiff peaks form. Using a rubber spatula, fold the whipped cream into the peanut butter mixture; set mousse aside in the refrigerator.


5. Assemble the cake: Using a serrated-blade knife, slice each cake horizontally into 2 layers. Place 1 layer of the devil's food cake on a cake stand and spread 1/3 of the peanut butter mousse over the top with a butter knife. Top mousse with a layer of the angel food cake and spread with half of the remaining mousse. Repeat with the remaining devil's food cake, mousse, and angel food cake. Wrap cake in plastic wrap and freeze for 2 hours. Stir ganache until smooth and spread evenly over the top and sides of the cake with a butter knife. Refrigerate the cake for 2 hours before slicing.
SERVES 10 – 12
This article was first published in Saveur in Issue #121

Saturday, May 22, 2010

of carrot muffins and in-laws


I have been blessed by a wonderful set of in-laws. They have welcomed me into their family with open arms, and I am so grateful. (David sent me a couple of the C&B napkins for Mother's Day - thanks so much!!!)

I found the recipe for the muffins above in a box of my Grandma Jacobsen's old handwritten recipes. It doesn't look like her or her sister's handwriting, so maybe it's from a friend (of course, it could be her's and I'm just mistaken)?

Anyway, whoever it came from, I made it yesterday. I tweaked it a little (a cup less sugar, raisins instead of nuts) and they were really good. Mmm.


I also found that if you are making muffins instead of loaves, it makes 24 of them and takes about only about 20 minutes for them to bake.


Saturday, May 01, 2010

yummy-ness


That's a brownie. Made from a recipe from Martha Stewart's "best of" issue that came a few months ago and that I just got around to finally finish reading.
Oh, it's good.
It's definitely as good as a boxed mixed, and, even though it calls for chocolate as well as cocoa powder, probably still cheaper (depending on the type of chocolate that you use).

Saturday, March 27, 2010

recipe: Ambrosia, a.k.a. "5 cup salad"

This fruit salad has lots of memories for me: it was a standard Easter dish at Gramma's house, and often served at other Moose/Jacobsen gatherings as well. Gramma taught me the recipe when I was staying with her for a few weeks one summer and it is so simple that even a 10-12 year old can remember it. And it's really yummy, too (come to think of it, I say that about every recipe that I post here).

So here you go (ready? you might want to write it down ..... ;) ):

Combine:
1 cup chunked pineapple
1 cup mandarin oranges
1 cup miniature marshmallows
1 cup flaked coconut
1 cup sour cream

Stir.

Cover and refrigerate for at least an hour, until the flavors have melded.

Yup.
So simple. And so good.

Wednesday, March 24, 2010

recipe: Island Spice Pork

I found a recipe a few days ago for a pork tenderloin that looked really good.

Normally I steer away from pork recipes because I'm not that fond of pork, but recently we have been buying it because it's cheap (and cheap is good). We buy tenderloins (quite a sizable portion of meat!) at Sam's Club and John cuts them down into chops (much more our size) and freezes them in packs of three or four. It ends up being an economical way to get good protein in our diets, and allows us to experiment with recipes we might not otherwise try, not wanting to ruin a large piece of meat.

I found this recipe on the blog "Annie's Eats" (which has some very good recipes and nice pictures of those recipes ... makes your mouth water :)) and the only modification that John made when he cooked it was that he used pork chops instead of a tenderloin. It was so delicious!!! As Annie mention in her post, it is an odd combination of spices, but it works well. Really well!!!


Ingredients:
For the spice rub:
2 tsp. kosher salt
½ tsp. ground black pepper
1 tsp. ground cumin
1 tsp. chili powder
1 tsp. ground cinnamon

2 pork tenderloins (about 2-2½ lbs. total) - we used 4 pork chops instead and had some of the rub left over
2 tbsp. olive oil

For the glaze:
½ cup packed dark brown sugar
1 tbsp. (2-3 cloves) finely minced garlic
1½ tsp. Tabasco sauce

Directions:
Preheat the oven to 350˚ F. Combine the salt, pepper, cumin, chili powder and cinnamon in a small bowl. Stir together with a fork to blend. Pat the mixture over the pork tenderloins.

Heat the olive oil in an ovenproof 12-inch skillet over medium-high heat. Place the tenderloins in the skillet and brown on all sides, turning occasionally, about 4 minutes total. Remove from the heat, leaving the pork in the skillet.

Stir together the brown sugar, garlic and Tabasco in a small bowl until blended. Spread the mixture evenly over the tops of the tenderloins.

Place the skillet in the preheated oven and roast about 20 minutes, until an instant-read thermometer inserted in the center of each tenderloin registers 140˚ F. Loosely tent the skillet with foil and let stand 10 minutes before slicing and serving.

Friday, March 12, 2010

on a whim


, originally uploaded by Lizi Beth.

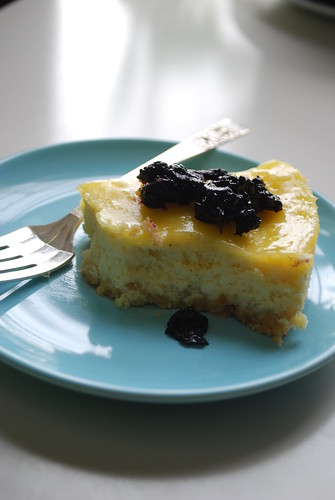
We were in the library on Monday afternoon, browsing through the gardening and home design books (gathering ideas for "someday"), when I turned around and was confronted by the dessert cookbooks, particularly one devoted to cheesecakes.
We hurried out of the library and I made one.


It was very good. Gone in 18 hours (should I admit that?) kind of good.

I used the recipe off the gigantic box of Philadelphia cream cheese from Sam's Club, making enough changes along the way that I think I can call it my own. I made up a blueberry sauce to go with it, but any berry or fruit sauce would do.

So here you go, my "On A Whim Cheesecake", or "Cheesecake To Satisfy Pregnancy Cravings"

1 lb cream cheese, softened
1/3 cup sugar
3/4 tsp vanilla
3 eggs

1 cup shortbread cookie crumbs
3 Tbs melted butter

1/3 - 1/2 cup lemon curd

Preheat oven to 325 degrees.
Mix cookie crumbs and butter, press into the bottom of a springform pan.
Bake 10 minutes (this will smell really good when it comes out).

Beat cream cheese, sugar and vanilla until well blended and light. Add eggs, mixing until just blended. Pour into the crust and bake for 35 minutes.
Spoon the lemon curd over the top of the cheesecake and bake an additional 5 minutes, or until the cheesecake center is almost set. Cool and refrigerate until chilled.


Tuesday, March 02, 2010

coffee sugar cookies


coffee sugar cookies, originally uploaded by Lizi Beth.

These cookies are so yummy! I made them a few weeks ago for Valentine's Day, and they lasted on the counter very well.
Usually having cookies last several days means that the recipe wasn't that great, but these were!!! They have ground coffee in them, though, so I wasn't able to eat more than one at once as this little baby gets a bit excited by caffeine. :)
I found the recipe over on this blog and followed it without changing anything. Sometimes I tweak a little as I go, but not this time. I'm so glad I let them be - they are just so good!


Coffee Sugar Cookies
1 cup butter, softened
1 1/4 cups sugar
2 cups flour
1/2 teaspoon baking powder
2 eggs
2 tbsp. fresh ground coffee (you can also use instant crystals or powder) I used fresh
1 teaspoon vanilla
1/2 teaspoon cinnamon
1/4 teaspoon salt

In a large bowl, cream together butter and sugar.
In a small bowl, combine eggs, vanilla, and coffee.
In yet another bowl, add together flour, baking powder, cinnamon, and salt.
Slowly add your egg mixture to the butter mixture until well combined. Slowly add flour mixture until fully combined, do not over beat.
I would chill this dough for AT LEAST one hour, preferably overnight. The dough is pretty wet even then, so be prepared to flour your rolling pin well.
When you are ready to bake, preheat oven to 375 degrees and bake for 8-10 minutes, or until edges are slightly golden. Allow cookies to cool completely before covering in any icing.


Monday, January 18, 2010

post #600 - baked potato soup


this baked potato soup is one of the easiest, yummiest and most versatile soups I've come across in a while. It turns out quite creamy - even without cream, which makes it a very cheap dinner - and the leftovers are a perfect lunch.
So far I've made it with chicken, with sausage and onions and plain, but the possibilities of changing up the flavor are endless, rather like the possibilities for customizing your baked potato come to think of it. :)
As the woman who blogged the recipe noted, it is a perfect one dish dinner, but would also be nice as a hearty starter. It's just the thing when the weather outside is dreary and cold.

Tuesday, January 12, 2010

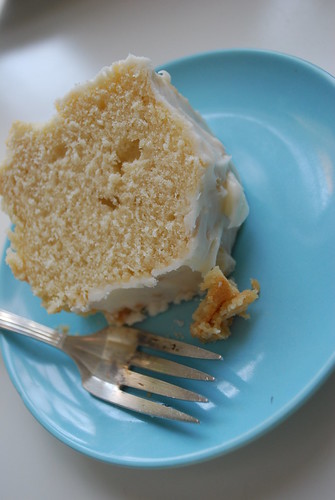
lemon cake


lemon cake, originally uploaded by Lizi Beth.
I made this lemon cake on Saturday, and this is all that is left. It's so yummy that we ate most of it in three days. The cake has the texture of a pound cake but has just enough tartness from the lemon juice in it to make it light and refreshing. It goes really well with morning coffee!
I found the recipe in Under The Tuscan Sun and simplified it a bit as I wrote it down, but this is the basic gist.

Cream together:
1 C butter
2 C sugar
Beat in:
3 eggs, one at a time. The mixture should be light and fluffy.

Combine:
3 C flour
1 tsp baking powder
1/4 tsp salt
Mix:
1 C buttermilk or cream into butter mixture alternately with the flour mixture.
Add:
3 Tbs lemon juice and
zest of 1 lemon
Pour into a greased tube pan (I used my springform pan with the tube insert) and bake for 50 minutes. Now, the recipe said to bake the cake in a 300 degree oven, but I found that the cake was still very runny after 70 minutes and at that point turned the oven up to 350. Next time I think I'll try baking it for 45 minutes at 350 and then check it, adding more time if needed.
After the cake has cooled and has been removed from the pan, glaze it with this icing:
1/4 C butter
1 1/2 C powdered sugar
3 Tbs lemon juice

Thursday, December 31, 2009

lemon curd

what do you all think of me trying to post a recipe a week? good idea? no?


This recipe is for a friend who asked for it a while back. I finally found it in my Grandma's recipe box written in her nursing shorthand, so here it is (translated from her shorthand so that you can read it too).

Lemon Curd
6 large lemons
2 cups sugar
3/4 cup butter cut into 12 pieces
6 eggs, beaten
Grate zest of 2 lemons. Mix with sugar. Squeeze lemons to make 1 cup juice. Heat juice, zest, sugar and butter in double boiler (if you don't have one you can make your own - like I did - using a heatproof bowl over a saucepan of simmering water making sure that the bowl does not touch the water) over simmering water until butter is melted. Add eggs and stir until thickened (about 20 minutes).
Pour into jars or bowl and cool.

This is lovely served with biscuits, scones, waffles or toast, and I have found a wonderful recipe for Lemon Curd Poppy Seed Bread from Williams-Sonoma that I want to share at some point.

Friday, December 04, 2009

comfort food

I was talking with my sister-in-law yesterday about different slow cooker recipes for chicken and pork, and I mentioned this one that I have made a few times. It is written for pork, but I've always made it with chicken. It turns out so yummy and (because the meat gets pulled) it's perfect for meat that you've over-cooked that has gotten tough or "gummy".
It also makes the house smell great!!!!
Pulled Pork (or Chicken) Tacos
adapted from Real Simple
2 cups salsa, plus more for serving
2 Tbls chili powder
2 Tbls dried oregano (Italian season works too)
2 Tbls unsweetened cocoa powder
2 1/2 lbs boneless pork butt or shoulder (or chicken)

In a 4- to 6 quart slow cooker combine the salsa, chili powder, oregano, cocoa and 1 teaspoon salt. Add the pork and turn to coat.

Cook, covered, until the meat is tender and pulls apart easily, on high for 4 to 5 hours or on low for 7 to 8 hours.

Using two forks, shred the pork and stir it into the cooking liquid. Serve with tortillas, cilantro, sour cream, lime and extra salsa.

Monday, September 28, 2009

oreo cheesecake

I made an Oreo cheesecake last night. It was SOOOOOOOOOO good. That is, it was good if you like Oreos. Because the recipe used 42 of them. As well as 2 pounds of cream cheese and 8 ounces of white chocolate and a half cup of butter. Not very diet friendly (not at all!) and very rich, but oh, it was GOOD.

Icebox Oreo Cheesecake
serves 12 (and I made for 2! what was I thinking .....) taken from Cook's Country
Oreo Cookie Crust
30 Oreo cookies, broken into rough pieces
7 tbls unsalted butter, softened
Cheesecake Filling
1 cup milk
4 egg yolks
1/4 flour
8 oz white chocolate, chopped (or 1 1/3 cups white chocolate chips)
2 lbs cream cheese, cut into 1" chunks and softened
1/3 cup powdered sugar
2 tsps vanilla
1/8 tsp salt (omit if using salted butter in the crust)
12 Oreo cookies, broken into rough pieces
Process cookies and butter in food processor until finely ground (I crushed the cookies and butter together in a bowl using the bottom of juice glass instead). Press cookie mixture evenly into the bottom and sides of 9" springform pan. Refrigerate until set, at least 1 hour.
Heat 3/4 cup milk in a saucepan over medium heat until simmering. Meahwhile, whisk yolks, flour and remaining milk in a bowl until smooth. Slowly whisk hot milk into yolk mixture. Return mixture to saucepan and cook over medium heat, whisking constantly, until very thick and glossy, 1 to 2 minutes.
Off heat, whisk in white chocolate until melted. Translfer pudding to bowl, press plastic wrap directly on surface, and refrigerate until cold and set, at least one hour.
With electric mixer on medium-high speed (or in a bowl with a heavy whisk) beat cream cheese, sugar, vanilla and salt until light and fluffy, about 2 minutes. Reduce speed to medium-low and mix in chilled pudding until just combined, about 30 seconds. Pour one-quarter of cream cheese mixture evenly into prepared pan and sprinkle one-third of cookies over surface. repeat process twice, then top with remaining filling. Refrigerate until set, at least six hours (I got impatient after two and stuck it in the freezer for half an hour). Serve.
Related Posts Plugin for WordPress, Blogger...